> For the complete documentation index, see [llms.txt](https://docs.realmacsoftware.com/elements-docs/llms.txt). Markdown versions of documentation pages are available by appending `.md` to page URLs; this page is available as [Markdown](https://docs.realmacsoftware.com/elements-docs/using-elements/elements-ai/elements-ai-assistant.md).

# Elements AI Assistant

Set up the Elements AI Assistant and use it to build, edit, and refine your website

The Elements AI Assistant works inside Elements and can make changes directly to your open project. Use it to build and refine pages, write content, generate images, create custom components, and work through larger tasks with an understanding of your project's existing design and content.

You remain in control of the process. Describe the result you want, inspect the changes in Elements, and continue the conversation to refine the result.

## Before you start

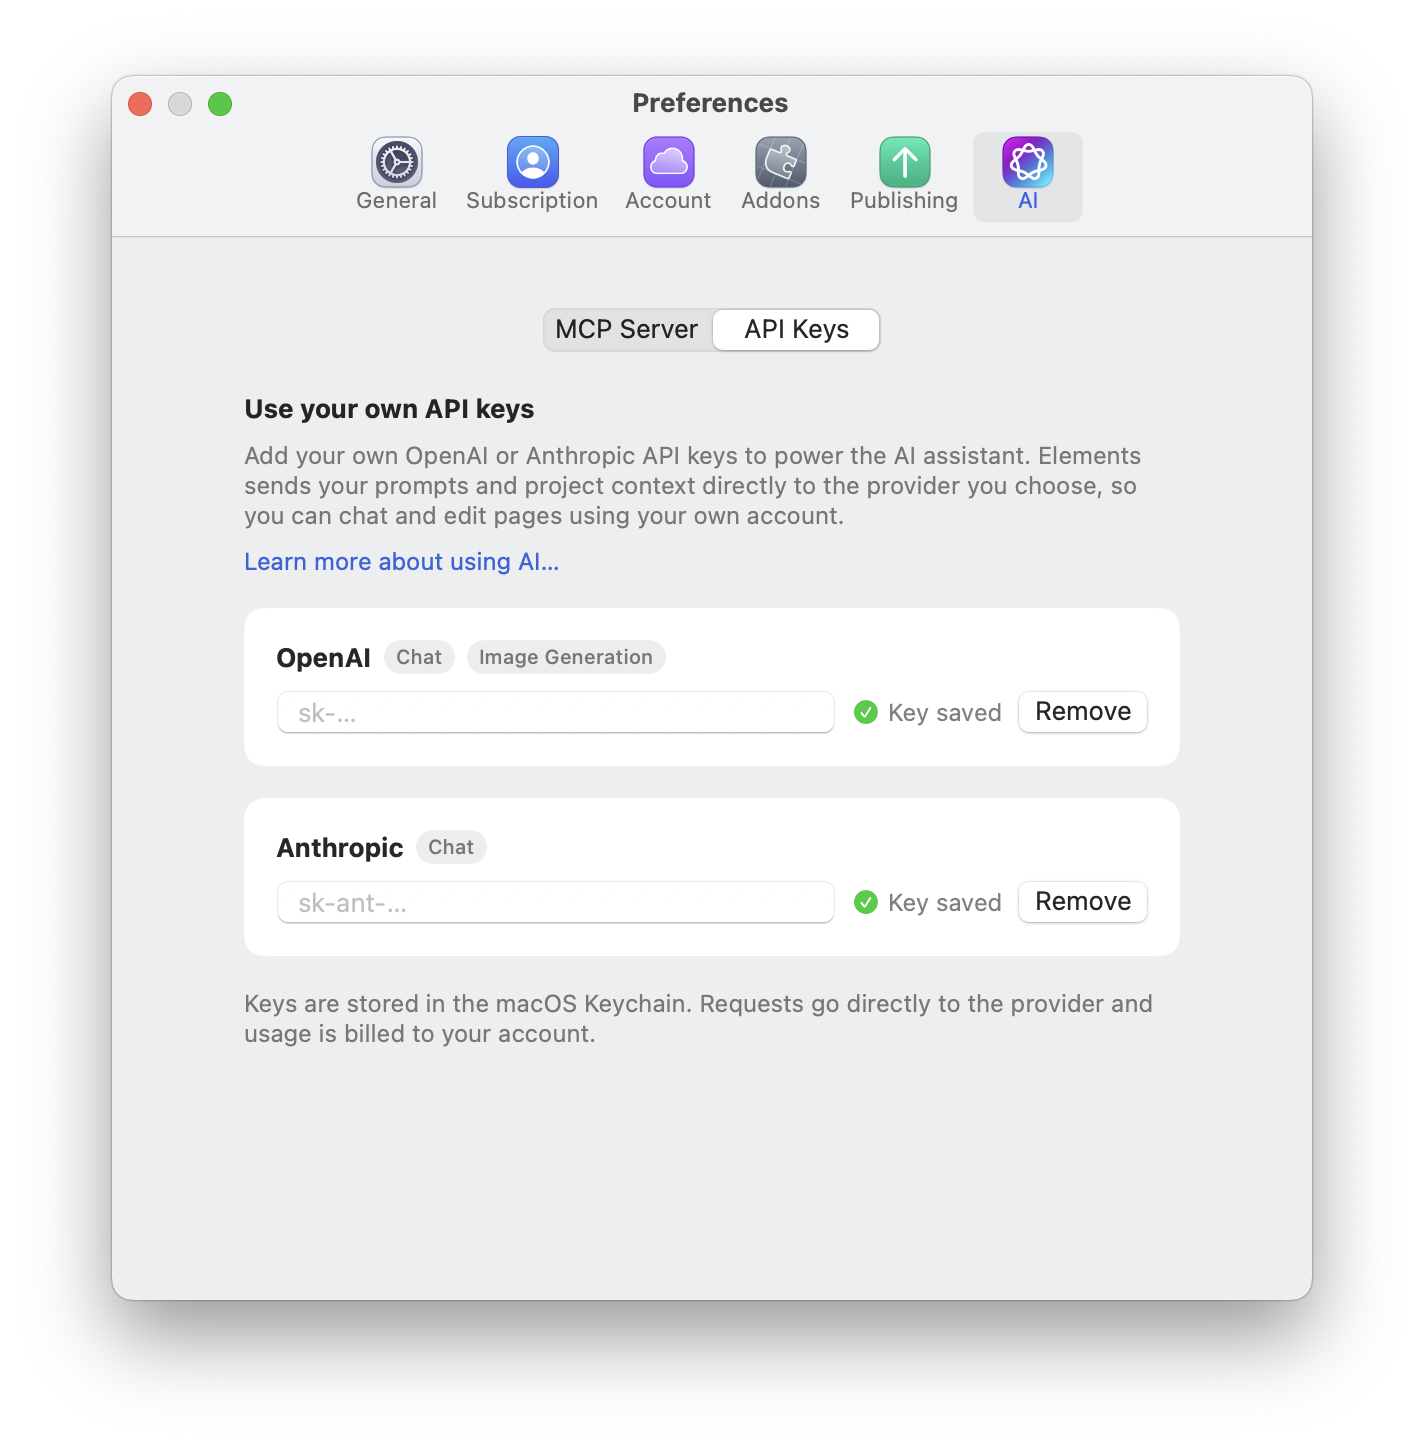
The Assistant uses your own OpenAI or Anthropic API account. Add a key for the provider you want to use before opening the Assistant.

| Provider           | Features                  |
| ------------------ | ------------------------- |
| OpenAI             | Chat and image generation |
| Anthropic (Claude) | Chat                      |

You can add a key for either provider, or add both. Image generation requires an OpenAI API key.

### Add an API key

1. In Elements, open **Settings** to show the Preferences window.
2. Select **AI**, then **API Keys**.
3. Paste your key into the **OpenAI** or **Anthropic** field.
4. Check that **Key saved** appears beside the field.

The full settings path is **Settings > AI > API Keys**.

<figure><img src="https://3876014504-files.gitbook.io/~/files/v0/b/gitbook-x-prod.appspot.com/o/spaces%2FNy6AECEVH2p4eFDicpM1%2Fuploads%2Fgit-blob-86a1e961f90a960bb27b252b101fe0b72a8df79a%2Felements-ai-api-keys.png?alt=media" alt="Elements Preferences showing AI > API Keys, with OpenAI supporting Chat and Image Generation and Anthropic supporting Chat"><figcaption><p>Add your OpenAI or Anthropic API key in Settings > AI > API Keys.</p></figcaption></figure>

Your keys are stored in the macOS Keychain. Elements sends your prompts and relevant project context directly to the provider you choose, and usage is billed to your account with that provider.

To remove a saved key, click **Remove** next to the provider.

## Open the AI Assistant

Once you have added an API key:

1. Open the project you want to work on.
2. Click the **sparkles icon** in the tabs at the top of the right-hand inspector sidebar.
3. Choose an available model from the menu at the bottom of the panel.
4. Enter your request and send it to begin.

<figure><img src="https://3876014504-files.gitbook.io/~/files/v0/b/gitbook-x-prod.appspot.com/o/spaces%2FNy6AECEVH2p4eFDicpM1%2Fuploads%2Fgit-blob-3349fe9868ce8991e4bad233213ac1c2bf393a4a%2Felements-ai-assistant-and-wiki.png?alt=media" alt="Elements showing The Little Bakery project, with project memory below Pages on the left and the AI Assistant open under the sparkles tab on the right"><figcaption><p>The AI Assistant is in the right-hand sidebar. AI Memory appears below Pages in the left-hand sidebar; this development screenshot uses its earlier name, AI Wiki.</p></figcaption></figure>

If the Assistant is missing from a custom workspace, right-click the panel icons to find and open it. You can also restore the default workspace.

## Choose a model and effort

The model menu at the bottom of the Assistant only shows models from providers whose API key you have saved:

* An **OpenAI** key makes the supported OpenAI models available.
* An **Anthropic** key makes the supported Claude models available.
* If you add both keys, you can switch between both providers without leaving the chat.

Elements uses a curated list of supported models, so the exact names can change as providers update their services.

Use the effort menu beside the model to choose **Low**, **Medium**, **High**, **Extra high**, or **Max**. **Medium** is the default. A lower effort is useful for quick copy or styling changes. A higher effort can help with complex layouts, custom components, and multi-step work, but it may take longer and consume more tokens. Because you are using your own API key, greater token use can increase the amount billed by the provider.

After the Assistant has responded, the footer below the message area shows the session’s input, output, and cached token totals. Use your provider’s account or usage dashboard for billing totals.

## Set AI options for this project

Click the **AI** sparkles button in the document toolbar to open **AI Options** to control how the Assistant works with the current project. Both options are enabled by default and saved with the project.

### AI Memory

Keep **AI Memory** on when you want the Assistant to read and maintain long-term project context. Turning it off can make the Assistant faster because it skips memory lookup and maintenance, but it will not read or update that context for future conversations. It instead works from the current project state and the context in your conversation. This setting also controls whether connected MCP clients can use that project’s memory.

### Prefer Templates

Keep **Prefer Templates** on when you want the Assistant to favour Smart Templates while building a new section or page. Turn it off when you want it to compose from core components. You can still use a template with this option off by naming it, attaching it to your message, or explicitly asking for one. The change applies to new chats.

## What the AI Assistant can do

### Build and edit pages

Ask the Assistant to create a new section, change a layout, add components, or refine an existing page. It can work with the components, Theme settings, Resources, and structure already in your project.

For example:

> Add a three-column services section below the introduction. Use the existing card style and stack the cards on mobile.

### Write and refine content

The Assistant can draft new page content or improve existing text. Tell it what the page is for, who it is aimed at, and the tone you want.

> Rewrite the introduction for people opening their first online shop. Keep it friendly and under 80 words.

### Generate images

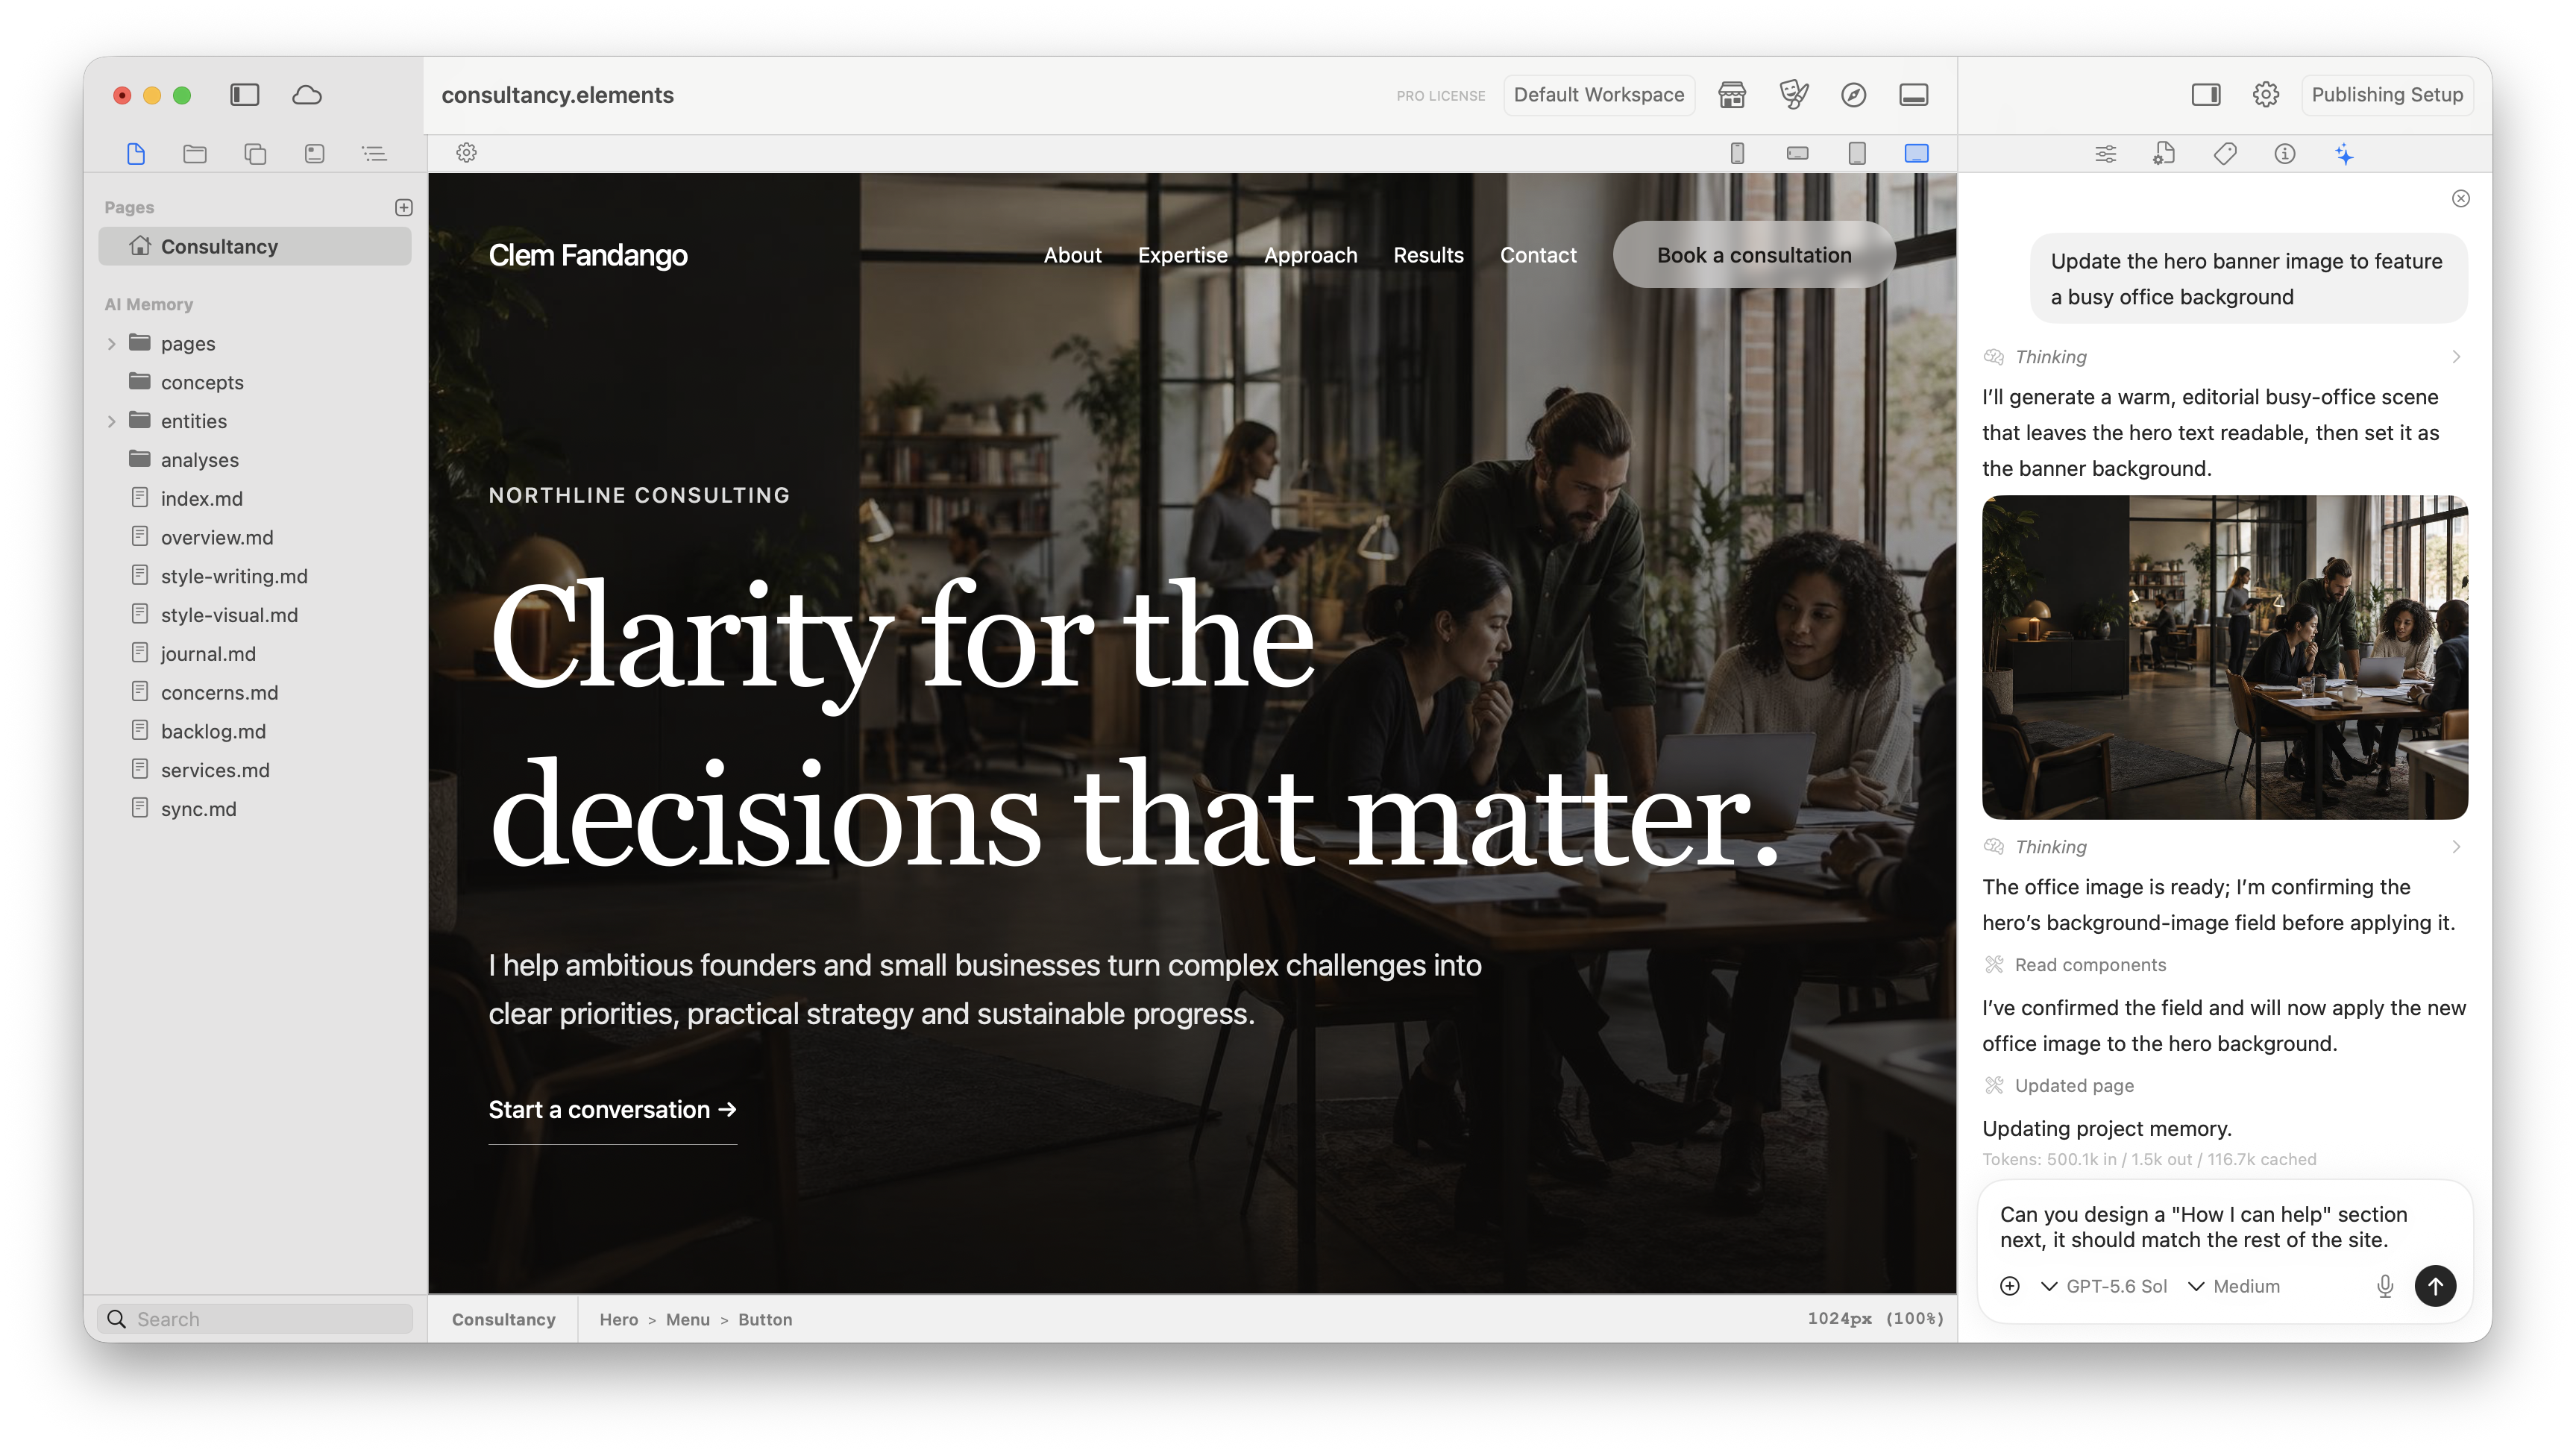
With an OpenAI API key, the Assistant can generate images for your project. Describe the subject, composition, style, and intended placement. Project context can help it create an image that fits the surrounding page.

> Create a warm, editorial photograph for this bakery hero. Leave clear space in the centre for the headline.

### Rewrite the copy on a page in one pass

When you want the wording changed across a whole page, or across the components you have selected, ask for a rewrite rather than a series of small edits. The Assistant makes the changes in one pass and shows them as a card in the conversation.

> Rewrite the copy on this page in British English and tighten every paragraph.

Expand the card to see each change, then click **Accept** to keep the rewrite or **Undo** to put the original text back.

### Create and refine custom components

Ask the Assistant to build a custom component when the standard components do not provide the behaviour you need. It can create the component code and add native Inspector controls for settings you may want to adjust later.

You can continue the conversation to fix a problem, change the design, or add another control. Test generated components at each breakpoint and check any interactive behaviour before publishing.

### Plan and complete larger tasks

For a request involving several steps, the Assistant can make a plan, work through the tasks, and show its progress in the conversation. Give it a clear outcome and any constraints before it starts.

> Rework this landing page for a photography workshop. Keep the existing header and footer, reuse the current colours, and make sure the page works well on mobile.

### Use and maintain AI Memory

AI Memory, called the AI Wiki in earlier versions of Elements, stores project-specific context such as the site's purpose, page structure, terminology, writing style, visual direction, decisions, and future work.

AI Memory is read-only for humans: you can browse its files in the left sidebar, but you cannot edit them directly. When AI Memory is enabled, the Assistant can read it for context and write or update entries as it learns about the project.

Ask the Assistant to record useful information or correct an existing entry:

> Add our writing guidelines to AI Memory: use British English, short headings, and a calm, practical tone.

Keeping this information in AI Memory helps future conversations start with the same project context.

## Add context and use skills

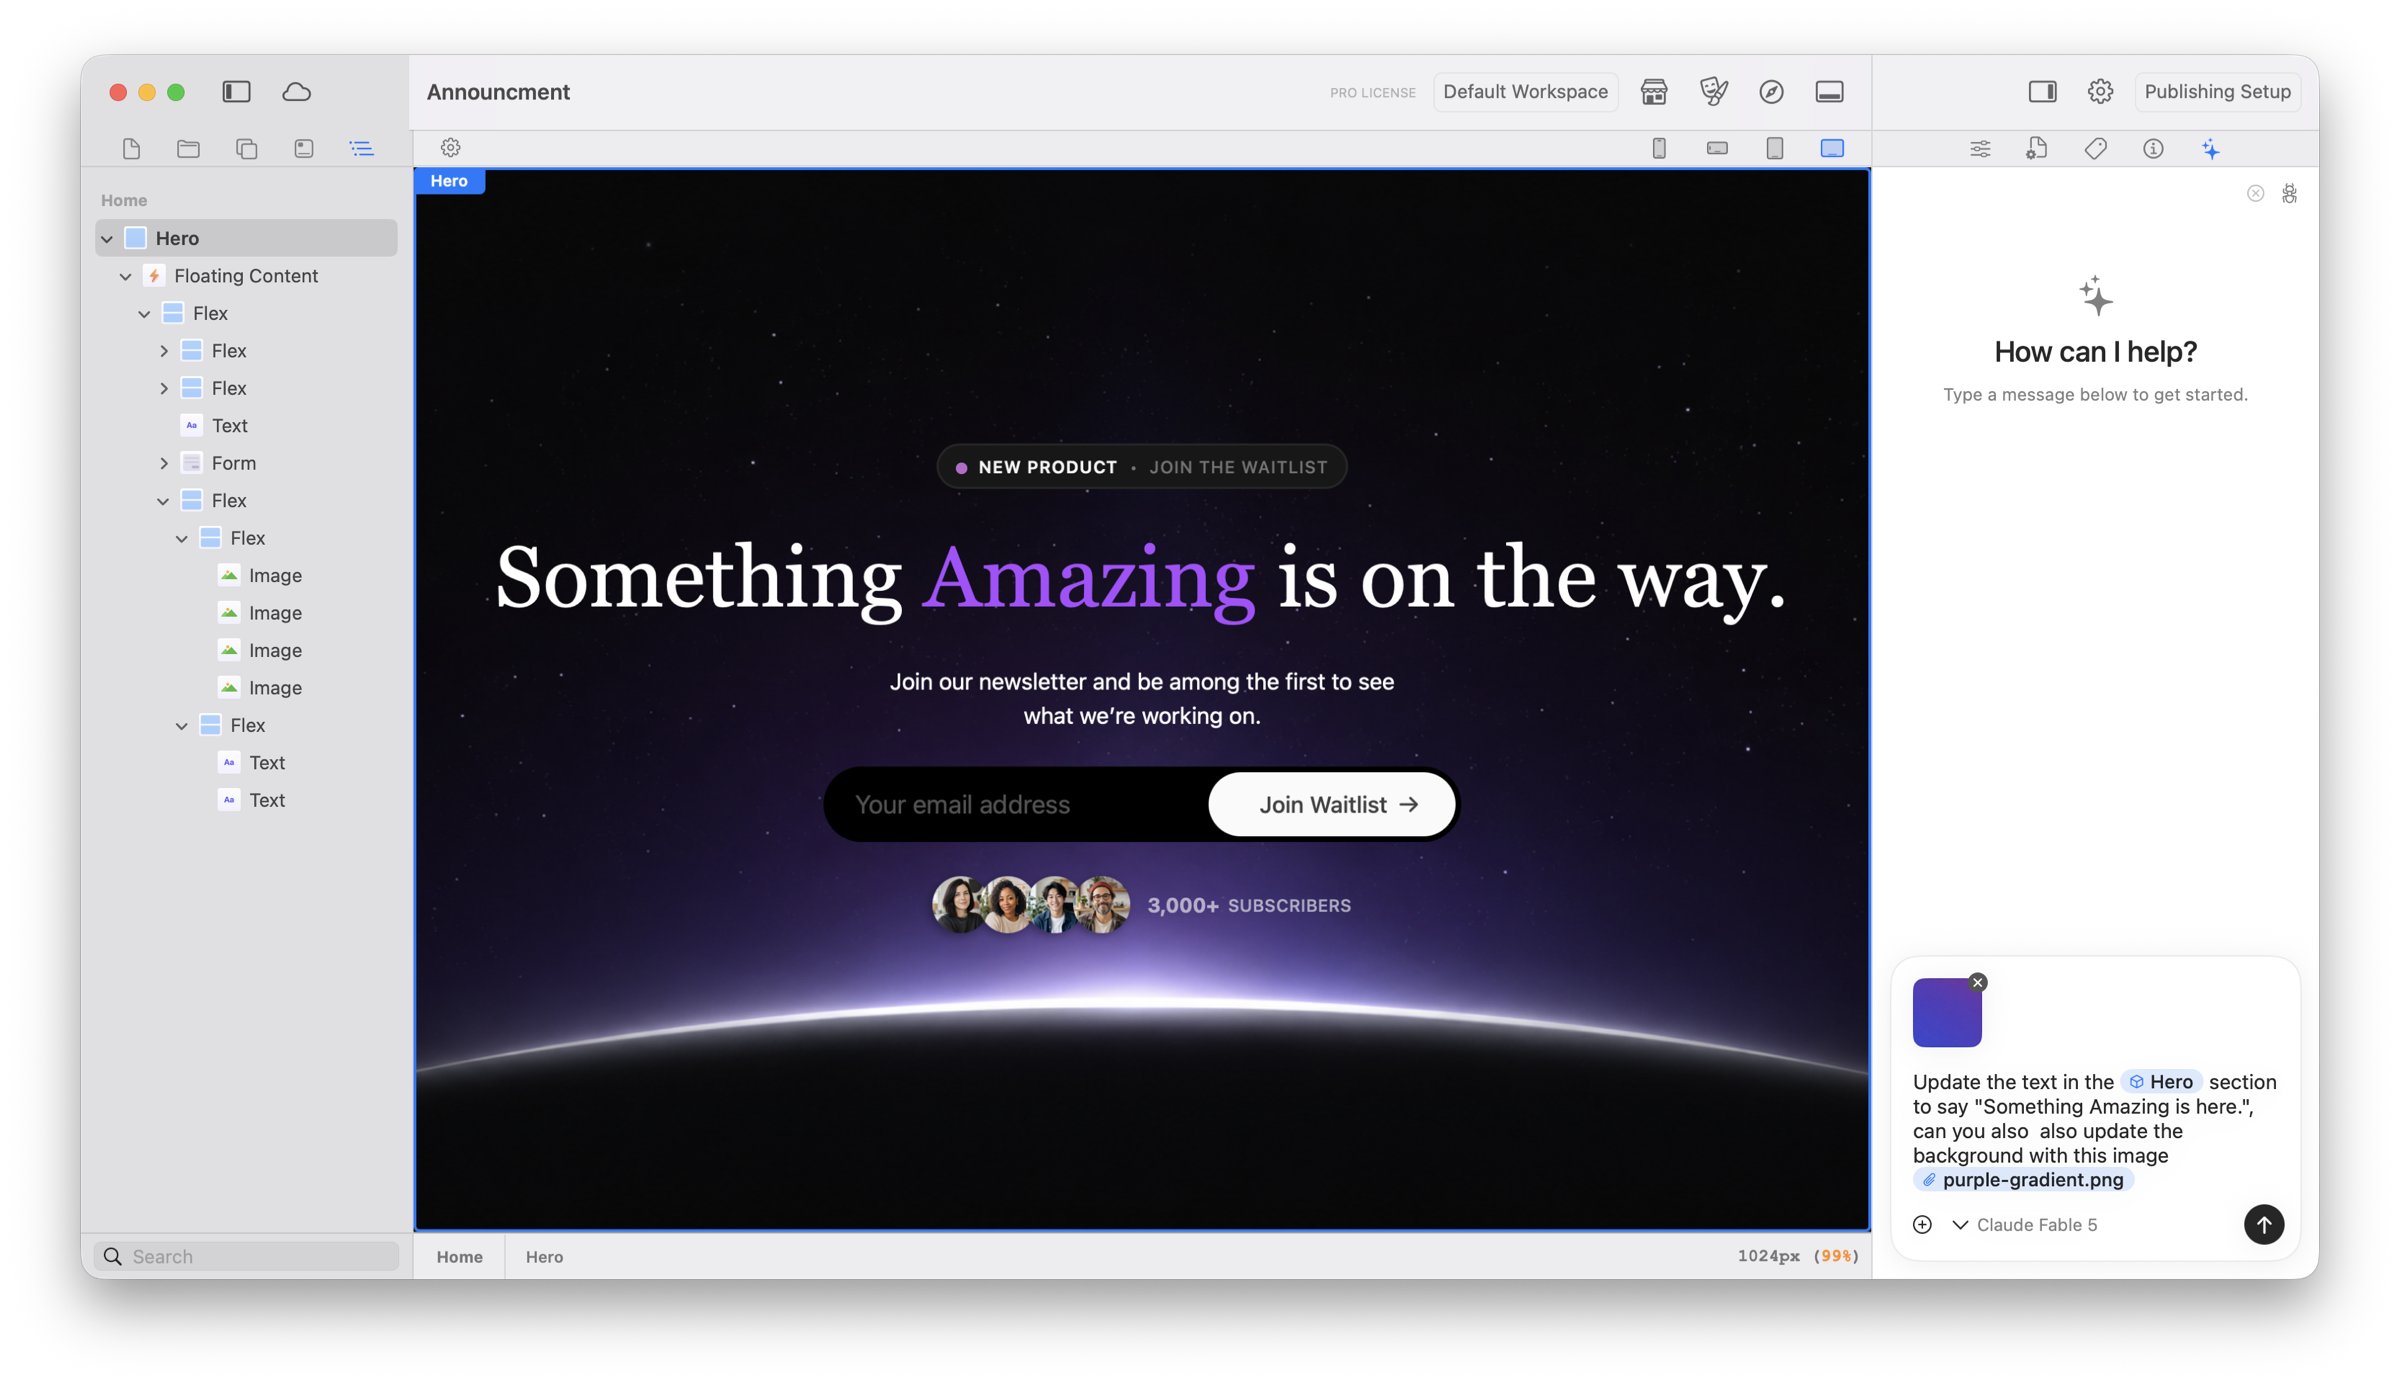
Give the Assistant a precise target by adding items to your message. You can drag and drop:

* A **page** from the Pages sidebar.
* A **component** from the canvas.
* An **image** from your project resources.
* **Images and other files** from Finder.

<figure><img src="https://3876014504-files.gitbook.io/~/files/v0/b/gitbook-x-prod.appspot.com/o/spaces%2FNy6AECEVH2p4eFDicpM1%2Fuploads%2Fgit-blob-9d1a6b04c6a341d46a52f0246632c1a4cdaa79ea%2Felements-ai-target-component-and-image-workspace.png?alt=media" alt="Elements with a Hero section selected and an AI Assistant message targeting the Hero component and purple-gradient.png image"><figcaption><p>Target a component and attach an image while you continue working in the editor.</p></figcaption></figure>

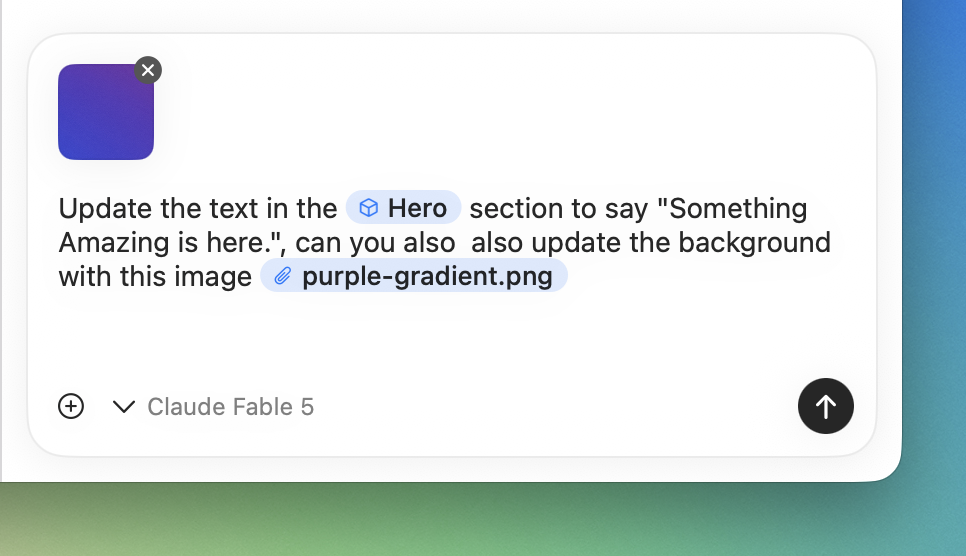
Each item appears as a named chip in the message. You can add several items and then describe how they should be used together. For example, you could target a Text component on a particular page and provide an image to use as its background.

<figure><img src="https://3876014504-files.gitbook.io/~/files/v0/b/gitbook-x-prod.appspot.com/o/spaces%2FNy6AECEVH2p4eFDicpM1%2Fuploads%2Fgit-blob-00320f63c42a36f959086c53c79bc28022198abb%2Felements-ai-target-page-component-image.png?alt=media" alt="Elements AI Assistant message targeting the Hero section and the purple-gradient.png image"><figcaption><p>Dropped items appear as named chips, making it clear which component and image the Assistant should use.</p></figcaption></figure>

To remove an item before sending, click the **×** on its preview or context chip. Adding an item to the message does not move or remove it from your project.

### Add the current selection

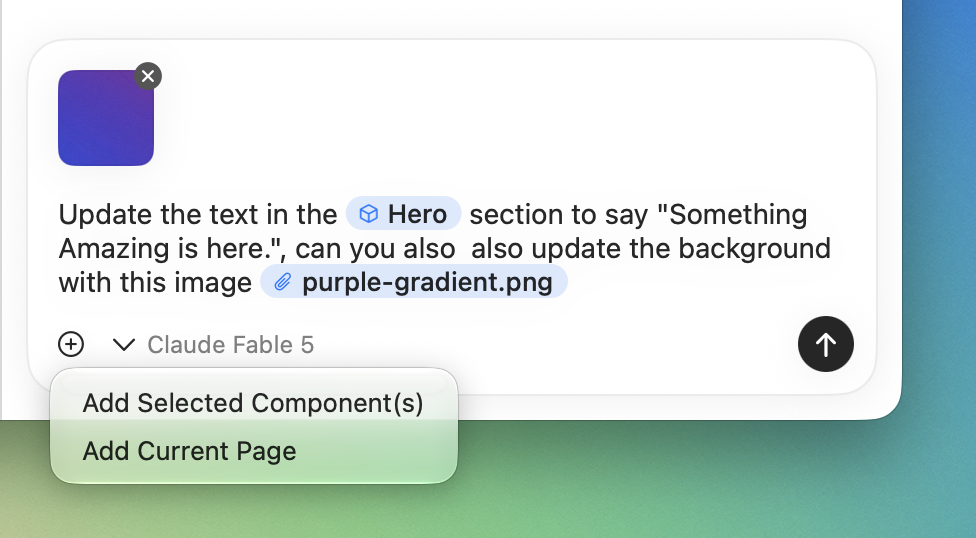
The **+** menu in the message field provides another quick way to add context:

* Choose **Add Selected Component(s)** to target the components currently selected on the canvas.
* Choose **Add Current Page** to target the page currently open in the editor.
* Choose **Add Files…** to select one or more supported images, text files, or PDFs without leaving Elements.

<figure><img src="https://3876014504-files.gitbook.io/~/files/v0/b/gitbook-x-prod.appspot.com/o/spaces%2FNy6AECEVH2p4eFDicpM1%2Fuploads%2Fgit-blob-ad8345dcfec10874f21acd8351247ee16e15ca69%2Felements-ai-add-context-menu.png?alt=media" alt="The plus menu in the Elements AI Assistant showing Add Selected Components and Add Current Page"><figcaption><p>Use the + menu to add selected components, the current page, or files. This development screenshot predates the Add Files option.</p></figcaption></figure>

You can also use `@` in the message field to add specific project context. Use `/` to browse available skills for specialised tasks. The options shown depend on the current project and version of Elements.

Focused context helps the Assistant understand exactly which part of the project you mean and reduces the need to describe it in words.

## Get better results

* **Describe the outcome.** Explain what you want the visitor to see or do.
* **Name the location.** Identify the page, section, or component to work on.
* **Include constraints.** Mention content that must remain, brand choices to reuse, and responsive requirements.
* **Work in stages.** For a large change, start with the structure, review it, and then refine the copy and styling.
* **Give precise feedback.** Point to the specific result that needs changing and explain what should be different.
* **Check the result.** Inspect the editor and browser preview at each relevant breakpoint before publishing.

## AI Assistant and MCP

The built-in Assistant is the simplest way to work with AI inside Elements. If you prefer to use an external AI client such as Claude Desktop, Codex, Cursor, or LM Studio, connect it through the [Elements MCP Server](/elements-docs/using-elements/elements-ai/elements-mcp-server.md).

Both approaches work with the project open in Elements, but their setup is separate: the Assistant uses **Settings > AI > API Keys**, while external clients connect through **Settings > AI > MCP Server**.

For a side-by-side list of what each option can do, see [What each option can do](/elements-docs/using-elements/elements-ai.md#what-each-option-can-do). In short, the Assistant is the only option that generates images, rewrites page copy in one pass, and lets you drag pages, components, and files onto a message. An external client is the only option that can open, create, close, or switch projects.

### Comparing costs

Using your own API key can be more expensive than connecting through MCP when your AI client already includes model usage in a paid subscription. API usage is metered and billed separately by OpenAI or Anthropic, even if you also pay for ChatGPT or Claude.

Many AI subscriptions bundle substantial usage into a fixed monthly price. Using that subscribed client through Elements MCP can therefore be more economical for regular or intensive work. Plan limits still apply, and the cheaper option depends on the model, the amount of work, and the terms of your subscription. For occasional use, direct API billing may cost less.

Check your provider’s current plan limits and API pricing before choosing.


---

# Agent Instructions
This documentation is published with GitBook. GitBook is the documentation platform designed so that both humans and AI agents can read, navigate, and reason over technical content effectively. Learn more at gitbook.com.

## Querying This Documentation
If you need additional information that is not directly available in this page, you can query the documentation dynamically by asking a question.

Perform an HTTP GET request on the current page URL with the `ask` query parameter, and the optional `goal` query parameter:

```
GET https://docs.realmacsoftware.com/elements-docs/using-elements/elements-ai/elements-ai-assistant.md?ask=<question>&goal=<endgoal>
```

`ask` is the immediate question: it should be specific, self-contained, and written in natural language.
`goal` is optional and describes the broader end goal you are ultimately trying to accomplish on behalf of the user. GitBook uses it to tailor the answer towards what is most useful for that goal.

The response will contain a direct answer to the question and relevant excerpts and sources from the documentation.

Use this mechanism when the answer is not explicitly present in the current page, you need clarification or additional context, or you want to retrieve related documentation sections.